| Main Page | Events | NY State News | Swap Area | Forum | Members Area | Photo Album | LiMBO Officers | LiMBO Info | News in Limbo LiMBO Links | Join Now | LiMBO-Mart |
| Four of us got together for a weekend to swap out our old and broken popup canvas for new 3 window canvas. We took plenty of photos and learned many things. We did two Westies in one day. | |
 |
 |
 Nevin's had a broken screen and some canvas deterioration |
 Phil's had moth holes all over and greasy a tear. |
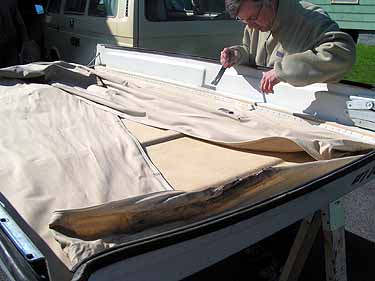
 An essential tool. A good place to work on the top |
 We popped the top! |
 Like the books say, mark and study the original. |
 Pulling the staples and removing the tacking strip. |
 We had to remove the latch to staple.
 |
 Making sure staples are flush. Don't want them to catch the canvas when it is in the stowed position. |
 Installing the new canvas. |
 We taped up the new canvas to avoid catching it anywhere when we put the top back on. |
 Believe it or not, there are 2 people in this photo. I'm squashed in the inside screwing down the tiny screws that hold the canvas to the roof. Bryan, on the outside, was helping me center the screws in the holes. |
 Before starting on Nevin's canvas, Binns gives it all a good vacuuming. |
 After having studied his installation, Nevin carefully lays out his new canvas. There is a substantial difference between the pre-85's in the way to attach the canvas to the top. Nevin's has rails and screws, Phil's had staples and a tacking strip. |
 After having learned some tricks, we bolt the top back on. |
 Phil's van - Completed installation |
 Nevin's van - Completed installation |
WESTFALIA POPTOP CANVAS REPLACEMENT
Who: Phil, Nevin, Binns, and Bryan
What: Replaced the canvas in our popup tents
When: Last day in April
Where: Phil's house in NY
Why: Deteriorating canvas, broken screens, moth holes, and a greasy tear.
Written by Phil for the newsletter
It all started back at the end of winter. Nevin and I both decided to replace our aged and deteriorating popup tents on our Westies. Nevin's is an ‘87 and mine is a ‘84. We both realized that this was not going to be a one man, one afternoon project. So, we looked around the web, asked folks, read manuals, and did all sorts of research on how to do the job. Our research concluded that there are 2 schools of thought on the popup tent replacement. Do it with the top on, or do it with the top off. We decided that the best alternative for the replacement is to take the top off. This means unbolting the top and lifting it off the van which we knew would required a few people to do. Since both of us were changing our tents we decided to have a "Poptop Party". In other words, invite some folks for a weekend and replace our canvas. Word got around and Bryan Belman volunteered because he is going to replace his canvas this year and wants to know the ins and outs of it, and my camping partner, Binns Handy, being an all around good fellow, volunteered to drive in for the affair. Now we had two vans and four people, all good, smart, and experienced Westy owners.
With a flurry of emails flying back and forth we hashed out what tools to bring and whatever documentation we had on swapping out the canvas. Later, we learned just how important it is to get the right stapler for earlier 80's Westies since their canvas is stapled to the top with hundreds of staples. Not so with the later 80's Westies, Nevin's had aluminum rails that hold his to the top.
Nevin arrived mid-day on Friday and we used the time to unscrew the rails that held our canvas to the roof of the van. There are some hundred tiny screws and we had to be careful not to lose them. The rails we marked with a Sharpie to note drivers and passenger side as well as front and rear. Meanwhile, Binns arrived around dinner time, and Bryan an hour or so later. Beer, pizza, and a lot of VW talked consumed the evening. Soon, we were sacked out getting some rest from the week's work and the traveling.
The next morning was a bright sunny day with the chill that a late April morning can have here in the Northeast. A perfect day for the task ahead. I volunteered my van to go first. The first thing we did was use 3 cable ties around the arms of the lifting mechanism (which to my pain, we found out wasn't a good idea). They are spring loaded and will popup when we lift the top off if not secured in the closed position. We then unbolted the top and off it went. However, to step back in time a little, during our earlier email exchanges it was decided it would be a good idea to have a holding fixture for the tops after taking them off the vans. I got a couple of sawhorses and toe-nailed some 2X4's vertical across the top to support the weight of the fiberglass top. Nevin had brought some carpet material which we stapled to the top of the 2X4’s to prevent scratching the tops. It took all four of us to carry the top off the van after unbolting it, it was pretty heavy and awkward, but with 4 guys, not too bad. Note: we learned to duct tape up the loose canvas we unscrewed from the roof earlier, on mine it caught on the lift mechanism as we lifted the top off the van. With the top off , we turned it upside down and laid it on the holding fixture.
All of the documentation, notes, and articles had said to study and compare how the tent is attached to the top and to layout the new tent and compare before we do anything, and that is what we did. Like hawks looking down at their prey, we studied everything. With a pencil we marked out centers for all four side as well as drawing a line all around the inside to reference height. We saw that the tent was stapled every inch through the tacking strip with a bunch in the corners. We also noted that the tent itself was stapled to the top every 6 inches or so to hold it in place before you laid the tacking strip on top. With everyone satisfied at studying the tent, we started to pull out the staples. It went pretty fast with 4 people and quickly had the tent out of the top.
We placed the new tent in being careful to line up centers to centers and corners to corners. We fussed, pulled, and adjusted until we were all sure we had it right. Now it was time to staple the thing in. This is where we learned the value of getting the right staple gun to do the job. Nevin brought 2 staple guns, I had one, and Binns had brought his, as well as borrowing his brother's contractor type staple gun. Thank god he did. It is narrow going in there and you need a gun that can get into tight spaces as well as being able to drive the staple through the tacking strip and into the wood. Binn's brother's staple gun was the only one that did the job with ease. All the others couldn't drive the staples all the way in or get in the tight spaces that needed to be stapled. With the right gun, the stapling went smooth. We all made sure the staples were flush with the surface to avoid catching the new canvas on the staple when the canvas is in the stowed position. It was in this stapling process that I had a "moment". A time of irrational fear that simmered to the top of my consciencnous, a moment of panic. I looked at the new canvas lying there and choked out the cry, "Hold it, I think we got the tent INSIDE OUT!" Everyone snapped their head around and looked at the canvas. I said, "The screens are on the outside". A moment passed and Binns calmly looked at me and said, "Yeah, but the zippers are on the inside. How else are you going to close the flaps if you're in the van?" I gulped, blinked, thought, and rationality slowly crept in and I muttered lowly, "Yeah, your right", as I pictured myself climbing to the top of the van on a rainy night to zip up the flaps. This was a testament to the graciousness of these fellows in the fact that I heard no one mutter the word "idiot" under their breath
Soon we had the new canvas stapled in to our satisfaction. Now it was time to put the top back on the van. The 4 of us lifted it up and placed it on the van. Bryan and I were on the inside and Binns and Nevin were on the outside jogging the top around to get it lined up with the holes. Suddenly there was a loud bang and I felt a sharp pain. Stunned, it didn't take long to realize that the 3 large cable ties weren't enough to restrain the spring loaded lifting mechanism. The cables ties had failed and one of the arms shot up grazing the side of my head. I saw stars, but I couldn't help but think that it could have been much worse if someone had their face over those arms. I had to sit for a few moments for the world to stabilize but was able to continue. Soon we had it all bolted down We didn't know it when we did mine, but we found out on Nevin's that is much easier to bolt the lifting mechanism first making it easier to line up the bolt holes in the hinges at the rear.
With the top bolted back in place it was time for the last step; screw the canvas down through the rails to the body of the van. Realizing that this is no more than a 2 man job because it has to be done on the inside, we moved Nevin’s van so 2 of us could start on his. Having done mine first, taking Nevin's top off was a breeze. In no time at all we had his off and on the sawhorses. We all did the hawk pose again studying Nevin's canvas. His 87 is much different than my 84. He has rails holding the canvas to the top. No staples, and no tacking strips were needed. Binns and Nevin went to work replacing his canvas while Bryan and I went to work screwing the canvas down to the roof. The best way to do this is start in the back which is by far the toughest place to do. You need a short cordless screwdriver as there isn't much room. Start in the center and work towards the corners. This took some time to do. I had to lay my hulking 6' 2" frame in a contortionist position and tug and pull the welting on the canvas into position and poke a hole through the welting and then line up the tiny screw to the hole. Not easy! Often, after driving the screw through the welting, the screw would be at an odd angle away from the hole. Bryan, on the outside had to use a flat thin paint scraper sometimes to nudge the screw tip into the hole so I could finish screwing it down. The new canvas on mine was a tight fit. It didn't allow for much play, thus the reason for having to do all this maneuvering. Another note to add is that this was done on a beautiful cool late April day, yet it got hot back there. I’d hate to do that on a 80 degree day. Also, Nevin's canvas was dark red and his van was in the shade, so he needed a flashlight to see what he was doing.
It was slow going screwing the canvas to the roof. Somewhere in the process I was called out to lift Nevin's top back on his van. We taped his canvas up to not catch on anything. We had the spring loaded lifting arms tied down with several wraps of strong webbed nylon belting, and learned to bolt the lifting arms to the top first. This made for a quick installation of Nevin's top back on his van. Bryan and I went back to screwing down the canvas on mine and Binns and Nevin started to do the same thing on his. One note, before Nevin left home he had removed part of his upper bed and mattresses, which provided easier access when screwing down the canvas in the back. Another note to make is that the welting needs to be notched when doing the corners, especially in the front. You can use your old canvas as a guide to do that.
We almost finished at the same time. In fact, Nevin's van was done about 20 minutes before mine. We had started the project after 9:00 AM and had finished at almost 5:00 PM. Pretty good I'd say. The only bummer of the whole day was the lift mechanism breaking the three cable ties and grazing my head. Other than that, we all had a terrific weekend. It was fun to get-together and working as a team to get the job done in record time. What a great bunch of guys.
Nevins Comments
- There are two distinct types of tents. One for pre '85's and one for post '84's and the installation methods are vastly different.
- Saw horses with the longitudinal padded rails are a necessity to support the inverted top in a comfortable work position to fasten the tent to the top.
- Four able bodied men are also recommended to lift the top off the body (one at each corner) and invert it on the sawhorses. Same goes for the reinstallation of the top on the body.
- Do not use plastic cable ties to secure the front tension struts. Use a heavy duty lashing strap or several wraps of rope. Make sure they are well forward of the spring loaded pivot and will not slip back allowing the struts to open. There is plenty of potential energy in those springs that can do severe damage and injury if released.
- Proper tools are essential. Metric openend, box and ratchet wrenches. Small angle battery powered screw driver(s) w/phillips inserts. A lighted model is very useful or just a plain flashlight will do. Electric staple gun with 1/4 X 9/16 staples. Staple removing tools, screw drivers, hammer, etc.
- Small jars, cans or other type of containers to hold bolts and nuts. Use separate containers for each type removed from various assembly points.
- If time permits, remove the front luggage rack and clean out accumulated debris.
- Follow this sequence of operations:
- With top up, remove front bed tray and mattress. Remove mattress from rear bed tray. Though not necessary, it makes removal of the screws a little easier from the van's top.
- Remove all screws from the four alum strips securing tent to van's roof. Lightly brush with wire brush and mark with marker pen position on top. IE: Front, back, left ,right.
- Lower top down or leave sightly open, secure lifting struts with straps or rope.
- Remove four nuts from bolts from brackets holding lifting struts to top.
- Remove 6 bolts from rear hinges (3 each side) at rear of top.
- With a min of four people lift top several inches and move top to rear off roof.
- Carefully invert top on prepared sawhorses.
- Remove staples and plastic strips or screws from alum strip depending on which type of top you are working on (pre '83 or post '83)
- Mark middle points on four sides of top and middle points on top edge of tent sides.
- Lay tent in position and staple plastic strip at each mid-point.
- Check corner positions and continue stapling tent toward each corner. On tents for the post '83 tops, you should find 8 small wooden blocks (one at each corner and one at each mid-point). Replace if any are missing. Align tent top to these and insert one staple. These tents have a sewn in welting
on both the top and the bottom, so press the welting into the molded groove, lay alum strips in position with large ridges down and screw in position.- Tape new tent in rolled up position to inside of top with duct tape.
- Manpower again needed here. Lift and invert top off sawhorses and move to rear of van. Lift high enough to clear roof and move forward into position. Position front strut brackets onto bolts in top, put on nuts and remove straps from struts. Tighten nuts.
- Lift one rear corner enough to insert bolts in rear hinge and tighten. Exact position can be gauged from marks on roof. Same procedure on other side. Before inserting any bolts in top of van roof, use small pieces of caulk to seal bolt head. Check if top raises OK and locks in down position. If not, adjust as required.
- Now the fun part. Lay alum hold down strips in position on van's roof over the bottom edge of the tent with the welting toward the inside. Start screwing the strips into the original holes in the top. Best to do the rear one first as you don't have much head room back there. At the corners it is necessary to notch the welting to fit around the corner. It may take a little poking and pulling to get it seated, but be patient, you're on the home stretch.
- Check top closing, latching and opening. Recheck all bolts and nut fastenings for tightness.
- Re-install rear mattress, front bed tray and mattress and you're ready for another season of carefree dry camping.
Binns Comments
By undoing the arms at the top, there is less weight and dangling junk when you walk the top towards the back. Having the arms off the top simplifies fitting the new canvas too.
We duct taped the hinges in the collapsed position, and rolled up and taped the new canvas before reinstallation, to avoid snagging or scratching. A possible minor improvement would be to tape up the hinges and old canvas when taking the top off as well.
Use a #1 phillips bit for the tiny screws? As a point of pride, we didn’t loose a single one doing two vans.
BTW the staple gun was an electric Duofast carpet tacker that shot 3/16 x 9/16 staples, they are about $150. I liked it so much I’m going to buy one the next width up, more choices of staples sizes and materials. One of the small inexpensive pneumatic staples that shoot 1/4" staples would probably be good also. A hand staple gun would be an exercise in frustration, and neither of the consumer electric guns we had got in close enough. You could do without a stapler on the new style tops like Nevin’s.
 |
| Drawing courtesy of Nevin Lescher |